0

errorhelp.com: Find Solutions To Error Messages

Website where you can search for computer errors and find solutions. No need to signup, but simply submit an error message you want to get a fix for and get solutions submitted by people who encountered the same problem.


Currently http://www.errorhelp.com has amost 80.00 errors and solutions in its database If you did not find a solution to your error on bug.gd and later solved your problem by other means then you might consider improving the site by sharing your solution with others.

Features:

  • Search and find a fix to your error message.
  • Submit solution to your error and share it with others.
  • Currently database has 79,413 errors and solutions.
  • Rate and comment on solutions.
  • Keep track of submitted errors in one place (account required)
  • Firefox Extension and Firefox/ IE search bar addons for quicker access.
  • Similar website: ErrorKey.
2

Do Loop - They are a web analyzer service


Do Loop - They are a web analyzer service that provide wide range of data information about any website for free.
They provide website statistics in connection with core traffic, Social reach, Useful graphs, Handful resources & Worth estimations that can be convert into business model revenues. Right now they use about 18 open API sources to gather information, they store 168,102,794 records in our databases and growing. Their goal is to let Webmasters & Visitors parallelly to understand the web a bit better.

http://www.doloop.com/
0

Shortcut to directly connect to a broadband network

you can create Shortcut to open the Network Connections page.

1. Right click on a empty area on desktop, and click on New and Shortcut.

2. Type rundll32.exe shell32.dll,Control_RunDLL ncpa.cpl into the location area, and click on the Next.

3. Type Network Connections for the name, and click on the Finish button.

4. Then Just Drag The broadband connect icon to the Desktop

5. you are done...


Double click it and you will open the Broadband and you can connect now.

0

How to Uninstall and Remove Windows 7 or Vista Leaving Windows XP on Dual Boot System

Windows operating system supports dual-booting a PC, where users can install multiple OSes and select which system to boot up to on machine startup. If you have installed Windows 7 or Windows Vista on top of current existing Windows XP to make the PC a dual boot system, but now decided to ditch or dump the Windows 7 or Windows Vista partition to revert to the old good classic Windows XP follow the guide below to uninstall and remove Windows 7 or Windows Vista to leave only Windows XP without having to reinstall the OS, and without affecting saved files and data.

Important: Do not use this tutorial if your dualboot system is Windows 7 and Windows Vista.

  1. Boot up and log on to Windows XP desktop.
  2. Insert the Windows Vista or Windows 7 DVD installation disc into CD-ROM or DVD-ROM optical drive.

    Alternatively, mount the Windows 7 or Windows Vista DVD ISO image on any virtual drive.

  3. Run Command Prompt, or click directly to Start menu -> Run command.
  4. In the command prompt or the Run text box, issue the following command and hit Enter:

    [DVD Drive Letter]:\boot\bootsect.exe /nt52 ALL /force

    For example,

    If the DVD drive path is D:, then enter the following:

    D:\boot\bootsect.exe /nt52 ALL /force

    The step will remove the boot menu to select operating system to start.

  5. Remove the DVD disc and restart the computer.
  6. The computer will boot up with Windows XP installation partition.
  7. Manually remove files and folders of Windows Vista or Windows 7, including Windows, Program Files and Users folder. If you’re installing to separate partition, just format the partition to clean it instantly (with FDisk, Disk Manager of Computer Management or third party partition management software such as Partition Magic or EASEUS Partition Manager).
  8. On the root system folder of Windows XP, delete Boot.BAK and BootSect.BAK. The two files are remnant backup leftover files of previously installed Windows Vista or Windows 7 bootloader, but no longer useful for Windows XP only system.

Tip: NT52 is the MBR (Master Boot Record) used by Windows XP and Windows Server 2003, while Windows Vista uses NT6. So if you’re uninstall Windows 7 in Vista/7 dual boot system, change the NT52 in the command to NT60.

Fast Shortcut: It’s also possible to format the Windows Vista or Windows 7 partition straight away, and then start the computer with Windows XP Setup CD to repair the system partition, or run the “bootsect /nt52 c:” command above from the \boot\ folder of leftover OS immediately to repair the boot partition.

Tip: When startup repair the boot record after removing an installed operating system from dual-boot or multi-boot system, always use the highest version of Windows installation DVD/CD to perform the repair. For example, in a tri-boot PC with Windows XP, Vista and 7, after uninstalling Windows 7, use Windows Vista to repair the system. If the PC is restored and reverted back to Windows XP, then use the Windows XP setup CD.

0

How Computers Boot Up


An outline of the boot sequence

Things start rolling when you press the power button on the computer (no! do tell!). Once the motherboard is powered up it initializes its own firmware - the chipset and other tidbits - and tries to get the CPU running. If things fail at this point (e.g., the CPU is busted or missing) then you will likely have a system that looks completely dead except for rotating fans. A few motherboards manage to emit beeps for an absent or faulty CPU, but the zombie-with-fans state is the most common scenario based on my experience. Sometimes USB or other devices can cause this to happen: unplugging all non-essential devices is a possible cure for a system that was working and suddenly appears dead like this. You can then single out the culprit device by elimination.

If all is well the CPU starts running. In a multi-processor or multi-core system one CPU is dynamically chosen to be the bootstrap processor (BSP) that runs all of the BIOS and kernel initialization code. The remaining processors, called application processors (AP) at this point, remain halted until later on when they are explicitly activated by the kernel. Intel CPUs have been evolving over the years but they’re fully backwards compatible, so modern CPUs can behave like the original 1978 Intel 8086, which is exactly what they do after power up. In this primitive power up state the processor is in real mode with memory paging disabled. This is like ancient MS-DOS where only 1 MB of memory can be addressed and any code can write to any place in memory - there’s no notion of protection or privilege.

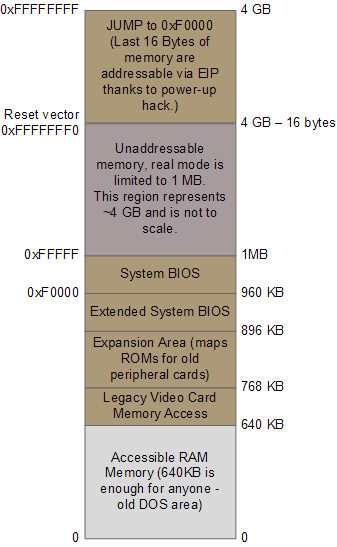
Most registers in the CPU have well-defined values after power up, including the instruction pointer (EIP) which holds the memory address for the instruction being executed by the CPU. Intel CPUs use a hack whereby even though only 1MB of memory can be addressed at power up, a hidden base address (an offset, essentially) is applied to EIP so that the first instruction executed is at address 0xFFFFFFF0 (16 bytes short of the end of 4 gigs of memory and well above one megabyte). This magical address is called the reset vector and is standard for modern Intel CPUs.

The motherboard ensures that the instruction at the reset vector is a jump to the memory location mapped to the BIOS entry point. This jump implicitly clears the hidden base address present at power up. All of these memory locations have the right contents needed by the CPU thanks to the memory map kept by the chipset. They are all mapped to flash memory containing the BIOS since at this point the RAM modules have random crap in them. An example of the relevant memory regions is shown below:


The CPU then starts executing BIOS code, which initializes some of the hardware in the machine. Afterwards the BIOS kicks off the Power-on Self Test (POST) which tests various components in the computer. Lack of a working video card fails the POST and causes the BIOS to halt and emit beeps to let you know what’s wrong, since messages on the screen aren’t an option. A working video card takes us to a stage where the computer looks alive: manufacturer logos are printed, memory starts to be tested, angels blare their horns. Other POST failures, like a missing keyboard, lead to halts with an error message on the screen. The POST involves a mixture of testing and initialization, including sorting out all the resources - interrupts, memory ranges, I/O ports - for PCI devices. Modern BIOSes that follow the Advanced Configuration and Power Interface build a number of data tables that describe the devices in the computer; these tables are later used by the kernel.

After the POST the BIOS wants to boot up an operating system, which must be found somewhere: hard drives, CD-ROM drives, floppy disks, etc. The actual order in which the BIOS seeks a boot device is user configurable. If there is no suitable boot device the BIOS halts with a complaint like “Non-System Disk or Disk Error.” A dead hard drive might present with this symptom. Hopefully this doesn’t happen and the BIOS finds a working disk allowing the boot to proceed.

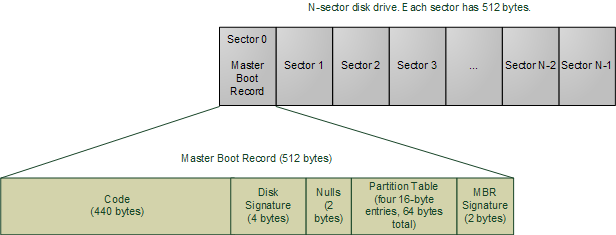
The BIOS now reads the first 512-byte sector (sector zero) of the hard disk. This is called the Master Boot Record and it normally contains two vital components: a tiny OS-specific bootstrapping program at the start of the MBR followed by a partition table for the disk. The BIOS however does not care about any of this: it simply loads the contents of the MBR into memory location 0×7c00 and jumps to that location to start executing whatever code is in the MBR.

The specific code in the MBR could be a Windows MBR loader, code from Linux loaders such as LILO or GRUB, or even a virus. In contrast the partition table is standardized: it is a 64-byte area with four 16-byte entries describing how the disk has been divided up (so you can run multiple operating systems or have separate volumes in the same disk). Traditionally Microsoft MBR code takes a look at the partition table, finds the (only) partition marked as active, loads the boot sector for that partition, and runs that code. The boot sector is the first sector of a partition, as opposed to the first sector for the whole disk. If something is wrong with the partition table you would get messages like “Invalid Partition Table” or “Missing Operating System.” This message does not come from the BIOS but rather from the MBR code loaded from disk. Thus the specific message depends on the MBR flavor.

Boot loading has gotten more sophisticated and flexible over time. The Linux boot loaders Lilo and GRUB can handle a wide variety of operating systems, file systems, and boot configurations. Their MBR code does not necessarily follow the “boot the active partition” approach described above. But functionally the process goes like this:

  1. The MBR itself contains the first stage of the boot loader. GRUB calls this stage 1.
  2. Due to its tiny size, the code in the MBR does just enough to load another sector from disk that contains additional boostrap code. This sector might be the boot sector for a partition, but could also be a sector that was hard-coded into the MBR code when the MBR was installed.
  3. The MBR code plus code loaded in step 2 then read a file containing the second stage of the boot loader. In GRUB this is GRUB Stage 2, and in Windows Server this is c:\NTLDR. If step 2 fails in Windows you’d get a message like “NTLDR is missing”. The stage 2 code then reads a boot configuration file (e.g., grub.conf in GRUB, boot.ini in Windows). It then presents boot choices to the user or simply goes ahead in a single-boot system.
  4. At this point the boot loader code needs to fire up a kernel. It must know enough about file systems to read the kernel from the boot partition. In Linux this means reading a file like “vmlinuz-2.6.22-14-server” containing the kernel, loading the file into memory and jumping to the kernel bootstrap code. In Windows Server 2003 some of the kernel start-up code is separate from the kernel image itself and is actually embedded into NTLDR. After performing several initializations, NTDLR loads the kernel image from file c:\Windows\System32\ntoskrnl.exe and, just as GRUB does, jumps to the kernel entry point.

There’s a complication worth mentioning (aka, I told you this thing is hacky). The image for a current Linux kernel, even compressed, does not fit into the 640K of RAM available in real mode. My vanilla Ubuntu kernel is 1.7 MB compressed. Yet the boot loader must run in real mode in order to call the BIOS routines for reading from the disk, since the kernel is clearly not available at that point. The solution is the venerable unreal mode. This is not a true processor mode (I wish the engineers at Intel were allowed to have fun like that), but rather a technique where a program switches back and forth between real mode and protected mode in order to access memory above 1MB while still using the BIOS. If you read GRUB source code, you’ll see these transitions all over the place (look under stage2/ for calls to real_to_prot and prot_to_real). At the end of this sticky process the loader has stuffed the kernel in memory, by hook or by crook, but it leaves the processor in real mode when it’s done.

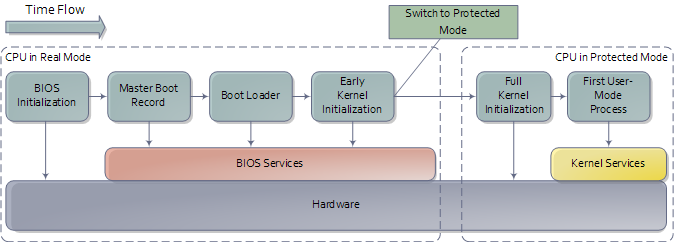
We’re now at the jump from “Boot Loader” to “Early Kernel Initialization” as shown in the first diagram. That’s when things heat up as the kernel starts to unfold and set things in motion. The next post will be a guided tour through the Linux Kernel initialization with links to sources at the Linux Cross Reference. I can’t do the same for Windows ;) but I’ll point out the highlights.


This Article Is From : http://duartes.org/gustavo/blog/post/how-computers-boot-up


0

Project jaNET!

jaNET is a Digital Life Assistant inspired from JARVIS on Iron Man movie.

Introduction

The virtual she-butler comes to life through project jaNET, a platform ready to host multiple creative and innovative pieces of code concerning domestic everyday tasks.
jaNET provides a built in framework to fulfil most of our daily information manners (like e-mail notification, weather conditions etc) but it can also be extend by wrapping 3rd party applications, processes or scripts in order to become a more flexible and smart system!

Framework
Some built in functions (currently 23) and commands, are explained below and used for the final custom synthesis.

Functions
User and Greetings
%user% - get user login
%daypart% and %partofday% - get the current part of the day (morning, noon, evening, afternoon, night, midnight)
%salute% - get the human greets like good morning, good evening and good afternoon

Weather (retrieve information from yahoo web service)
%todayday% - get the current day
%todayconditions% - get the today conditions as partly cloudy, sunny etc
%todaylow% - get current day low temperature
%todayhigh% - get current day high temperature
%tomorrowday% - get the day after
%tommorowconditions% - get the day after conditions as partly cloudy, sunny etc
%tommorowlow% - get day after low temperature
%tommorowhigh% - get day after high temperature

Localization
%day% - get system day
%time% - get current system time
%time24% - get the current system time in 24
%date% - get current system date

Net
%mailnum% - returns the number of a pop3 mail account that you have setup
%inetcon% - if it has an internet connection

Location
%whereami% - retrieves information have been sent from my mobile phone gps. The phone runs a custom python script that sends the location to a web service which produce a google maps page. This function is responsible to extract the readable address

System Console
%cls% and %clear% - clearing the console
%quit% and %exit% - terminate program

Commands
2.1. Bluetooth
set bluetooth on - enable bluetooth
set bluetooth enable - enable bluetooth
set bluetooth off - disable bluetooth
set bluetooth disable - disable bluetooth
get bluetooth state - returns the state of bluetooth as boolean (true/false)
get bluetooth status - returns the state of bluetooth as boolean (true/false)

2.2. Mail
set mail add - setup a pop3 account for %mailnum% function
set mail check - enable mail check every x milliseconds
set mail check off - disable mail check
set mail check 0 - disable mail check
get mail settings - returns pop3 settings
get mail state - returns the number of ms, 0 if it is disabled
get mail status - returns the number of ms, 0 if it is disabled

2.3. Sms
set sms add - supports Clickatel sms gateway
get sms settings - returns sms settings

2.4. Alarm, wake up call
set alarm add
0

‘Imaginary’ interface could replace real thing

Researchers are experimenting with a new interface system for mobile devices that could replace the screen and even the keyboard with gestures supported by our visual memory.

Called Imaginary Interfaces, the German project uses a small, chest-mounted computer and camera to detect hand movements. Unlike Tony Stark in "Iron Man," who manipulates holographic elements in his lab with his hands, users conjure up their own imaginary set of graphical interfaces. For example, people can manually draw shapes and select points in space that have programmed functions, such as a power switch or a "send" key, for example.


This interface could allow people to use gestures during phone calls, much as they do in face-to-face conversations, while eliminating traditional hardware elements.

"We definitely envision a system like this replacing all input for mobile devices," said Sean Gustafson, a research student at the Hasso Plattner Institute at Potsdam University in Germany and lead author of an upcoming study on the Imaginary Interfaces concept.

Button-pushers, screen watchers
The standard way one operates a cell phone or a computer, of course, involves using a touchpad, mouse or buttons to select options electronically displayed on a screen.

These devices cannot get any smaller really, Gustafson and his co-authors contend, because screens and buttons require a minimum size to remain viewable, touchable and hence usable.

Many attempts to advance beyond keyboards and mice have focused on gestures.
Yet these gesture-based interfaces have still relied on some sort of "real" visual reference, meaning one that other people can see and that does not exist solely in a user's mind: Think of "Minority Report"-style screens that people manipulate rather like conductors of an orchestra, or gaming on a Nintendo Wii.

In place of the screens found in these setups, some interface concepts use head-mounted projectors that display imagery on a wall or a hand, say, in order to provide a frame of reference. Sixth Sense, a project out of MIT, and Brainy Hand from the University of Tokyo are two such examples.

With Imaginary Interfaces, however, there is nothing to see; short-term visual memory instead serves as the reference, and like mimes, people can mentally record and "touch" these make-believe elements.

"People are able to interact spatially without seeing what it is that they create," said Patrick Baudisch, a professor of computer science at the Hasso Plattner Institute and Gustafson's teacher.

The un-imaginary device
In generating a virtual reality interface, the Imaginary Interfaces device combines a camera and a computer to see and then interpret gestures.

The device for now is about 2 inches by 2 inches square and attaches to the clothes on a user's chest. Its makers envision shrinking it down to the size of an unobtrusive button.

A ring of light emitting diodes (LEDs) around the camera beams out invisible infrared light. The camera sees this light reflected by the nearby gesturing hands but the distant background does not get illuminated.

To operate Imaginary Interfaces, people use two basic commands. Making an 'L' shape with one's non-dominant hand (typically the left) 'opens up' a two-dimensional plane where the finger tracing interaction will take place; the L acts as the lower left corner of the plane in this example.

Users can 'pinch' with the dominant hand to select a point in space on this plane that can serve a function. As an easy frame of reference, a grid can be visualized based on the lengths of the finger and thumb in the L gesture as a 'Y' and 'X' coordinate, respectively. Pinching at approximately 3, 2 — or three finger-lengths up and two thumb-lengths over — could press a virtual button.

Other more sophisticated methods of interfacing via one's imagination are in the works. "We are exploring how users can sketch interfaces, then use them," said Baudisch. "It has a cartoony quality to it."

Such a "draw your own interface" would have advantages, Gustafson said. "If the user places the user interface elements themselves then they will remember — visually and proprioceptually – the location for later use," he said. (Proprioception refers to the sense of our body parts and their relation to one another in space.) "If they ever forget the location, they can just redraw it."

Applications easy to imagine
This ability to create simple sketches on the fly opens up a range of new application scenarios, and could make phone conversations more like person-to-person interactions that often involve gestures.
"I would love to reclaim the hand gestures that are missing from normal telephone conversations," Gustafson told TechNewsDaily.

"We use our hands in conversation to, amongst other things, transmit spatial information that is hard to get across otherwise," Gustafson continued. "For example, driving directions and the like are much easier to get across with some simple hand movements. It would be wonderful to re-enable this communication channel for telephone conversations."

Imaginary Interfaces still needs work. The infrared detection of hand gestures by the camera does not function well outdoors in sunlight, for example.

And Imaginary Interfaces would not be detailed or precise enough for engineering schematics or the like. "Architectural drawings require a large amount of precision that is probably not possible without a high-res input and output channel," said Gustafson. "I like to think this system is best for 'napkin drawings' — simple visual representations of ideas that aid conversation."

A study about Imaginary Interfaces that includes several user trials will be presented at the 23rd Symposium of User Interface Software and Technology held by the Association for Computing Machinery in New York this coming October.
0

Play Any Latest 3D Game Without Graphic CARD


Often we stuck up with a computer that just doesn't provide enough power to run the latest game. The result being, you either spend a lot of money to get the latest graphics card / 3D card for your PC or you just read reviews of games like Crysis on gamespot and feel like a noob, fully knowing that your system just won't be able to support the game. Here is a wicked software with which you can beat 128-256 MB of graphics card requirements with a very modest 1GB RAM. The 3D Analyzer Tool was created and refined to overcome limitations posed by modern 3D Games and other Applications on several current mainstream 3D Cards. Advanced functionality will enable User selectable 3D Features not available in many older Cards.


What it does is, it uses a part of your RAM as Graphics card memory. For example, if you got 1GB RAM, then it'll use 128MB of it as a Virtual Graphics card, and the remaining 896MB will be used as a regular RAM. Cool right? So you can virtually emulate NVIDIA GeForce TI 4600,NVIDIA GeForce FX 4900 ULTRA, ATi Radeon 8500, ATi Radeon 9800 PRO and more. Follow the given procedure to use the software:

After downloading the software, install it.
After running the software, click on ‘Select’ option.
Select the exe file of game which u want to play.
Select the options as shown.
Note that I have selected the VendorID as 4098 and DeviceID 20040 as I want to select the ATi Radeon 9800 PRO graphics card (use the index provided in the screen on the right).
Click on Run.
Doesn’t matter even if you don’t save the batch file.
You are ready to roll!
Please note that the .exe file is to be selected from the main folder of game, and not the shortcut present on the desktop.
Enjoy all the latest games without having any graphic card.

Read more: http://www.techmynd.com/play-any-latest-3d-game-without-graphic-card/#ixzz0si4J9r7e

Download 3D Analyzer

Download 3D Analyzer (874 KB)
0

What is iPad? – The Apple Tablet PC


So, what's an iPad? iPad is half inches thin with 1.5 pounds weight and 9.7 inch IPS display. Its exactly in between a laptop and a multimedia digital mobile phone device or precisely to say in between an iPhone and an Apple MAC Laptop. You can browse the internet, manage and store your photos, watch movies, listen songs, access iTunes, download apps and games, play games, browse websites, watch YouTube videos and lot more. The best thing about iPad is that you can do these all things and more better then you do these at any Laptop or mobile phone. Because its not smaller like a mobile phone and not bigger like a laptop. But its in between these two yet still thin and light weighed. Safari, internet, mail, photos, videos, youtube, iTunes, AppStore, iBooks, maps, notes, calendar, contacts, search and lots more are the key features of an iPad. Its all in here.


iPad comes with a high-resolution, 9.7-inch LED-backlit IPS display which is remarkably crisp and vivid. The Multi-Touch technology on iPad has been completely reengineered for the larger iPad surface, making it extremely precise and responsive. With its lithium-polymer battery iPad can be used for up to 10 hours while surfing the web on Wi-Fi, watching videos, or listening to music. iPad will run almost 140,000 apps from the App Store. So you can use all those incredibly fun and useful apps - including everything from games to productivity apps - right out of the box. iPad is starting at $499.

Read more: http://www.techmynd.com/ipad/#ixzz0si0DqxPX

How IPad Looks Like


0

G-Speak Will Make Keyboard & Mouse Obsolete

A new system being developed by Oblong Industries harnesses gesture technology that uses special surfaces and displays that can track hand movements, providing the operator is wearing the special conducting gloves. The system works with images and videos, and has been dubbed the “G-Speak” spatial operating environment (SOE).

In a G-Speak environment everything on screen can be directly manipulated by gestures such as pointing, and the system simplifies the control of real-world objects such as robots or vehicles, and allows physical tools and interfaces to be used as input devices


John Underkoffler, co-founder of Oblong Industries, says G-Speak should be available for consumers within five years, and its combination of interpretation of gestures, real-world pixels and recombinant networking represents the biggest step forward in computer interfaces since 1984.

Underkoffler says applications for the new interface technology include the operation of 3-D interfaces, processing of large data sets, integration of multiple computers and large screens into building-scale work environments. G-speak networking’s collection of library components allows applications to scale dynamically and transparently across multiple computers, and in a LAN network this makes more effective use of CPU power and provides support for applications enabling collaborative work over the network. It will also be possible to add new people and computers to the network, and to add new code at run-time.

G-speak controls applications through hand poses, pointing, and hand movements, with input from several hands simultaneously being fully supported. Hand and finger motions are tracked to an accuracy of 0.1 mm at 100 Hz.

Using gestural I/Os is much more efficient at complex navigation tasks and selection/sorting, than the mouse and keyboard, but both will still be available for use when appropriate.

G-Speak is already in use by Fortune 50 companies, and by some universities and government agencies, and a software development kit running on Linux and Mac is already available.

More information:
-- Oblong.com - http://oblong.com/article/086E19gPvDcktAf9.html
-- More videos: http://vimeo.com/user922585/videos
-- Video on YouTube:
http://www.youtube.com/watch?v=KqyHM29VNqM
http://www.youtube.com/watch?v=dyMVZqJk8s4
0

‘Skinput’ turns body into touchscreen interface


Touchscreens may be popular both in science fiction and real life as the symbol of next-gen technology, but an innovation called Skinput suggests the true interface of the future might be us.

Microsoft and Carnegie Mellon University unveiled Skinput recently, showing how it can turn your own body into a touchscreen interface.
Skinput uses a series of sensors to track where a user taps on his arm. Previous attempts at using projected interfaces used motion-tracking to determine where a person taps.


Skinput uses a different and novel technique: It "listens" to the vibrations in your body.

Tapping on different parts of your arm creates different kinds of vibrations depending on the amount and shape of bones, tendons and muscle in that specific area. Skinput sensors can track those vibrations using an armband and discern where the user tapped.

"Accuracy is already good, in the high 90s percent accuracy for finger input," said project team member Chris Harrison, from Carnegie Mellon's Human-Computer Interaction Institute.

"The arm band is a crude prototype,” Harrison said. “The next generation could be made considerably smaller – likely easily fitting into a wristwatch."
2

How to Check Balance Of Prepaid Mobiles?

How To Check Balance? The Basic Question Which Troubles you when you switch from one cellular network provider to other.
With The Increased number of cellular network providers each day, more People struggling to check balance in their mobile account, This Post has tried to cover information about your mobile network provider in India.

Reliance GSM


How to check Balance on Reliance GSM Mobile?
Dial *367# From Your Reliance Mobile to Check Account Balance.
Customer Care Number for Reliance GSM Mobile: Dial *333

Tata Docomo


How to Check Balance on Tata Docomo?
To Know Account Balance information dial *111# from your Tata Docomo Mobile.
Get Interactive Voice Call Balance Announcement by dialling 12525 from your Tata Docomo Mobile.

Aircel


How to Check Balance on Aircel?
To Check your Balance in Aircel, Dial *125# from your Aircel Mobile.
For Voice Announcement of your balance, Dial 123
Customer Care Support Dial 121.

Idea


How to Check Balance on Idea?
To Check Account Balance in your Idea Mobile Dial *130# from Your Idea Mobile.
Customer Care Number for Idea: 98*** 12345
[Replace *** with respective Phone Number Series]

Airtel


How to Check Balance on Airtel?
To Check Balance in Airtel Dial *123# from Your Airtel mobile.
Customer Care Support for Airtel: 121


Vodafone


How to check balance on Vodafone?
To Check Balance from your Vodafone Mobile Dial *111# .
Happy to Help Customer Care Support: 111

BSNL


How to Check Balance on BSNL?
To Check Balance Dial *123# from your BSNL Prepaid Mobile.
0

How To Install Windows 7 On USB Flash Drive

Microsoft has been doing only right things with the much anticipated Windows 7 and the release candidate (RC) is available to download for free.


As you all know creating a bootable USB, or installing Windows 7 or Vista using USB is a piece of cake. It doesn’t take much time and effort to have a bootable USB. Now, after replaying to several e-mails about installing Windows 7 or Vista on a USB drive, I have decided to write this detailed guide.

Requirements to install Windows 7 on USB:

# An USB flash drive with a minimum of 6 GB disk space to install Windows 7 or Vista. You can use a 4 GB drive to install XP.

# Bootable Windows 7 USB or DVD.

# Free time

So let’s begin with the installing Windows 7 on USB procedure:

1. First of all, connect your USB to the machine and backup all the data from the USB drive.

2. Download VirtualBox portable, double-click on the executable file and extract the contents to your USB.


3. Now, go to the VirtualBox portable folder in USB, and execute the Portable-VirtualBox (.exe) file.

4. From here onwards, you need to follow the onscreen procedure to create a virtual disk and install Windows 7 on USB. Follow the install Windows 7 on VirtualBox guide to complete the process.

5. Once you finish the installation process, you can safely close VirtualBox and remove your USB drive.

6. You can now use this Windows 7 USB drive on any Windows machine that you want. To use Windows 7 on other machine, connect the Windows 7 USB, open USB drive, and run portable-VirtualBox file.
0

Why are my Desktop Icons Highlighted in Blue?

Start / Control Panel
Performance and Maintenance(if in Category View)
System / Advanced Tab
under Performance click on Settings / Visual Effects Tab
put a check next to
"Use drop down shadows for icon labels on the desktop"
Apply / Ok

If this still doesn't work, right-click on the desktop >
point to Arrange Icons By >
and make sure that "Lock Web Items on Desktop" is un-checked.

If you have Desktop settings set to "Lock Desktop Items"
you can't remove the background color.
It can be checked here too,
Right click on desktop / Properties / Desktop Tab /
Customize Desktop button / Web Tab
and take the check out of "Lock Desktop Items"
Ok / Apply / Ok

Also, if you have ever right clicked on an item and clicked
"Set as desktop item..." then this may be the problem. You need to make
sure that they are not selected. Do this by going to Control Panel /
Display / Desktop tab / then selcting "Customize Desktop".
Click on the Web tab and make sure none are selected.

Best Ways...

Right click on the Desktop and select Arrange Icons By> make sure that a check mark is not by
Lock Web Items on Desktop.
Then right click on the Desktop and select Properties. Then click Desktop tab> Customize Desktop button> Web tab> make sure that nothing is checked in the Web pages: windows and that Lock web items is not checked.

Try this, right click on Desktop> Properties> Desktop tab> select a different background and then click Apply and OK. Go back to the Advanced tab as before and uncheck the box:
Use drop shadows for icon labels on the desktop.
Then go back and recheck the box and see if that works.

Start> Run> type: sysdm.cpl then hit OK.
Click on Advanced tab> Visual Effects tab, check the box:
Use drop shadows for icon labels on the desktop then OK, Apply and OK.
 
Copyright © Design Your Dream!!