First Method:
A •Safe Work Around• - in Firefox or Google Chrome Browser.
(Did Not Work In IE8)
Click "Tools".....click "Options"......click "Content"
UN-check/Disable •enable JavaScript•
click OK.
Log back in to Yahoo! Mail through Your Browser -- Switch to Classic Mail....
THEN RE-Enable your Java Script.
=============================
2nd Method:
Lower your Screen Display Resolution:
When The Screen Resolution is too Low for the "New Yahoo! Mail" (formerly Beta),
A message appears asking "Do you want to switch to Mail Classic?"
Click ►"Yes"......
Once Done, RE-Set your Screen Resolution.
♦IMPORTANT NOTE -- Do The Screen Resolution in Stages!
A Screen Resolution less than the Original Setting causes Unstable Effects
in the way web pages and formats appears.
Best of Luck To You..
Showing posts with label tips. Show all posts
Showing posts with label tips. Show all posts
Multiple Home Pages with Mozilla Firefox OR Internet Explorer 7
Now that Internet Explorer has caught up (sort of) with modern browsers, I wanted to point out yet another function of tabbed browsing (click here for the popular and informative tabbed browsing tip ). If you like to check multiple sites every day or maybe use your browsing sessions for research, let your browser do some of the work for you by opening multiple pages at the same time.
Mozilla Firefox
- Open the first page you would like to see every time you start Firefox
- Click File –> New –> Tab (or Ctrl + T) to open a new tab
- Open the next page you want to see every time you start Firefox
- Repeat steps 1-3 for as many pages as you want to open automatically
- Click Tools –> Options from the menus
- Click the "Main" button at the top of the options screen
- Click "Use Current Pages" button in the Startup section
- Click the OK button at the bottom of the screen
Internet Explorer 7 (IE7)
- Open the first page you would like to see every time you start IE7
- Click File –> New –> Tab (or Ctrl + T) to open a new tab, or click the new tab button next to the current tab
- Open the next page you want to see every time you start IE7
- Repeat steps 1-3 for as many pages as you want to open automatically
- Click Tools –> Internet Options from the menus
- Click "Current" button in the Home page section
- Click the OK button at the bottom of the screen
OR after opening the tabs you want to set as your home pages:
- Click the little arrow next to the "Home" icon on the toolbar
- Click Add or Change home page
- Click use current tab set as your home page
- Click OK
Now when you start your browser, instead of being limited to just one page opening, you can get many.
[SOLVED] The Message Symbol Keeps Flashing In Nokia Phone
there is a constant message flashing symbol just besides the battery bar sometimes
it is due to the full memory..the memory may be phone memory or memory card..
if both the memory have sufficient space then ur SIM card memory is full for that
1. Go to Messaging
2. Select Options
3. Select SIM messages
4. Select and delete all the SIM message
That Should Stop The SIM SMS Full
it is due to the full memory..the memory may be phone memory or memory card..
if both the memory have sufficient space then ur SIM card memory is full for that
"Select and delete all the Sim messages that should stop the Sim full error...."
Yeah, I had this problem too! :-) What it usually means is the SIM card`s message memory is full, but if you wipe the SIM card`s messages the envelope goes away. Here`s how to do it:1. Go to Messaging
2. Select Options
3. Select SIM messages
4. Select and delete all the SIM message
That Should Stop The SIM SMS Full
Left click opens Properties or Right Click options
I’ve run more and more in to this problem with Keyboards and Mice related to a lock up of one of them. This is during normal user activities and results in the Left Mouse button not opening a program but the programs properties. You can still right click and do open however this is a pain.
I learned the solution Just Now When I Was reading a blog
He gave a simple fix which is given below
Fix: You must do all of these at the same time. Left Hand = LCtrl + LAlt + LShift while Right Hand = RCtrl + RAlt + RShift = Keyboard and Mouse reset.
To clarify hold down all Ctrl+Alt+Shift at the same time.
Shortcut to directly connect to a broadband network
you can create Shortcut to open the Network Connections page.
1. Right click on a empty area on desktop, and click on New and Shortcut.
2. Type rundll32.exe shell32.dll,Control_RunDLL ncpa.cpl into the location area, and click on the Next.
3. Type Network Connections for the name, and click on the Finish button.
4. Then Just Drag The broadband connect icon to the Desktop
5. you are done...
Double click it and you will open the Broadband and you can connect now.
How to Uninstall and Remove Windows 7 or Vista Leaving Windows XP on Dual Boot System
Windows operating system supports dual-booting a PC, where users can install multiple OSes and select which system to boot up to on machine startup. If you have installed Windows 7 or Windows Vista on top of current existing Windows XP to make the PC a dual boot system, but now decided to ditch or dump the Windows 7 or Windows Vista partition to revert to the old good classic Windows XP follow the guide below to uninstall and remove Windows 7 or Windows Vista to leave only Windows XP without having to reinstall the OS, and without affecting saved files and data.
Important: Do not use this tutorial if your dualboot system is Windows 7 and Windows Vista.
- Boot up and log on to Windows XP desktop.
- Insert the Windows Vista or Windows 7 DVD installation disc into CD-ROM or DVD-ROM optical drive.
Alternatively, mount the Windows 7 or Windows Vista DVD ISO image on any virtual drive.
- Run Command Prompt, or click directly to Start menu -> Run command.
- In the command prompt or the Run text box, issue the following command and hit Enter:
[DVD Drive Letter]:\boot\bootsect.exe /nt52 ALL /force
For example,
If the DVD drive path is D:, then enter the following:
D:\boot\bootsect.exe /nt52 ALL /force
The step will remove the boot menu to select operating system to start.
- Remove the DVD disc and restart the computer.
- The computer will boot up with Windows XP installation partition.
- Manually remove files and folders of Windows Vista or Windows 7, including Windows, Program Files and Users folder. If you’re installing to separate partition, just format the partition to clean it instantly (with FDisk, Disk Manager of Computer Management or third party partition management software such as Partition Magic or EASEUS Partition Manager).
- On the root system folder of Windows XP, delete Boot.BAK and BootSect.BAK. The two files are remnant backup leftover files of previously installed Windows Vista or Windows 7 bootloader, but no longer useful for Windows XP only system.
Tip: NT52 is the MBR (Master Boot Record) used by Windows XP and Windows Server 2003, while Windows Vista uses NT6. So if you’re uninstall Windows 7 in Vista/7 dual boot system, change the NT52 in the command to NT60.
Fast Shortcut: It’s also possible to format the Windows Vista or Windows 7 partition straight away, and then start the computer with Windows XP Setup CD to repair the system partition, or run the “bootsect /nt52 c:” command above from the \boot\ folder of leftover OS immediately to repair the boot partition.
Tip: When startup repair the boot record after removing an installed operating system from dual-boot or multi-boot system, always use the highest version of Windows installation DVD/CD to perform the repair. For example, in a tri-boot PC with Windows XP, Vista and 7, after uninstalling Windows 7, use Windows Vista to repair the system. If the PC is restored and reverted back to Windows XP, then use the Windows XP setup CD.
How to Check Balance Of Prepaid Mobiles?
How To Check Balance? The Basic Question Which Troubles you when you switch from one cellular network provider to other.
With The Increased number of cellular network providers each day, more People struggling to check balance in their mobile account, This Post has tried to cover information about your mobile network provider in India.
Reliance GSM

How to check Balance on Reliance GSM Mobile?
Dial *367# From Your Reliance Mobile to Check Account Balance.
Customer Care Number for Reliance GSM Mobile: Dial *333
Tata Docomo

How to Check Balance on Tata Docomo?
To Know Account Balance information dial *111# from your Tata Docomo Mobile.
Get Interactive Voice Call Balance Announcement by dialling 12525 from your Tata Docomo Mobile.
Aircel

How to Check Balance on Aircel?
To Check your Balance in Aircel, Dial *125# from your Aircel Mobile.
For Voice Announcement of your balance, Dial 123
Customer Care Support Dial 121.
Idea

How to Check Balance on Idea?
To Check Account Balance in your Idea Mobile Dial *130# from Your Idea Mobile.
Customer Care Number for Idea: 98*** 12345
[Replace *** with respective Phone Number Series]
Airtel

How to Check Balance on Airtel?
To Check Balance in Airtel Dial *123# from Your Airtel mobile.
Customer Care Support for Airtel: 121
Vodafone

How to check balance on Vodafone?
To Check Balance from your Vodafone Mobile Dial *111# .
Happy to Help Customer Care Support: 111
BSNL

How to Check Balance on BSNL?
To Check Balance Dial *123# from your BSNL Prepaid Mobile.
With The Increased number of cellular network providers each day, more People struggling to check balance in their mobile account, This Post has tried to cover information about your mobile network provider in India.
Reliance GSM
How to check Balance on Reliance GSM Mobile?
Dial *367# From Your Reliance Mobile to Check Account Balance.
Customer Care Number for Reliance GSM Mobile: Dial *333
Tata Docomo

How to Check Balance on Tata Docomo?
To Know Account Balance information dial *111# from your Tata Docomo Mobile.
Get Interactive Voice Call Balance Announcement by dialling 12525 from your Tata Docomo Mobile.
Aircel
How to Check Balance on Aircel?
To Check your Balance in Aircel, Dial *125# from your Aircel Mobile.
For Voice Announcement of your balance, Dial 123
Customer Care Support Dial 121.
Idea

How to Check Balance on Idea?
To Check Account Balance in your Idea Mobile Dial *130# from Your Idea Mobile.
Customer Care Number for Idea: 98*** 12345
[Replace *** with respective Phone Number Series]
Airtel

How to Check Balance on Airtel?
To Check Balance in Airtel Dial *123# from Your Airtel mobile.
Customer Care Support for Airtel: 121
Vodafone
How to check balance on Vodafone?
To Check Balance from your Vodafone Mobile Dial *111# .
Happy to Help Customer Care Support: 111
BSNL

How to Check Balance on BSNL?
To Check Balance Dial *123# from your BSNL Prepaid Mobile.
How To Install Windows 7 On USB Flash Drive
Microsoft has been doing only right things with the much anticipated Windows 7 and the release candidate (RC) is available to download for free.

As you all know creating a bootable USB, or installing Windows 7 or Vista using USB is a piece of cake. It doesn’t take much time and effort to have a bootable USB. Now, after replaying to several e-mails about installing Windows 7 or Vista on a USB drive, I have decided to write this detailed guide.
Requirements to install Windows 7 on USB:
# An USB flash drive with a minimum of 6 GB disk space to install Windows 7 or Vista. You can use a 4 GB drive to install XP.
# Bootable Windows 7 USB or DVD.
# Free time
So let’s begin with the installing Windows 7 on USB procedure:
1. First of all, connect your USB to the machine and backup all the data from the USB drive.
2. Download VirtualBox portable, double-click on the executable file and extract the contents to your USB.

3. Now, go to the VirtualBox portable folder in USB, and execute the Portable-VirtualBox (.exe) file.
4. From here onwards, you need to follow the onscreen procedure to create a virtual disk and install Windows 7 on USB. Follow the install Windows 7 on VirtualBox guide to complete the process.
5. Once you finish the installation process, you can safely close VirtualBox and remove your USB drive.
6. You can now use this Windows 7 USB drive on any Windows machine that you want. To use Windows 7 on other machine, connect the Windows 7 USB, open USB drive, and run portable-VirtualBox file.
Turbo C For Vista or Windows 7 !!!
I tired to run Turbo C in Vista and failed and so found a solution for the same. Now U can run Turbo C++ 3.0 on Windows XP 64 bit , Vista 32 bit and 64 bit OS (in full screen) using the tutorial below :

(1) Install the software DOSBox ver 0.72 ( 1.2 MB ) (Freeware) from the link below (Direct Link)
http://prdownloads.sourceforge.net/dosbox/DOSBox0.72-win32-installer.exe?download
(2) Before going to the details u have to create a folder (any name will do). Here we name it as Turbo
(3) Copy the TC into the Turbo folder. You can download Turbo C/C++ here.
(4) Run the DOSBox 0.72 from the icon located on the desktop or from the location of the installation folder
(5) Then u are presented with two screens which look like the command prompt in Windows. One with a Z prompt. You can ignore the other screen.
(6) Type the following commands at the command prompt [Z]:
Mount [Type in any alphabet that u wish except z] [Type the source of the turbo C] press enter
(7) Now , Type in the following commands after the Z prompt:
Z: mount d c:\Turbo\ [The folder TC is present inside the folder Turbo]
(8) Now u should get a message which says: Drive D is mounted as a local directory c:\Turbo\
(9) Type d: to shift to d: prompt . Next follow the commands below
cd TC [The contents inside the folder Turbo gets mounted as a virtual drive (Here D drive)
cd Bin
TC or Tc.exe [This presents u the Turbo C++3.0 screen]
(10) In the Turbo C++ goto Options>Directories> Change the source of TC to the source directory [D] ( i.e. virtual D: refers to original c:\Turbo\ . So make the path change to something like D:\TC\include and D:\TC\lib respectively )
===========================================================
Points to Note:
(1) In order to get the full screen use the key combination of Alt and Enter
(2) When u exit from the DosBox [precisely when u unmount the virtual drive where Turbo C++ 3.0 has been mounted] all the files u have saved or made changes in Turbo C++ 3.0 will be copied into the source directory(The directory which contains TC folder)
(3) It is a good idea to backup your files in the source directory prior to running DOSBox 0.72
(4) For additional help go through the readme file located in the installation folder or look on the website of the DOSBox forum.
(5) Don't use shortcut keys to perform operations in TC because they might be a shortcut key for DOSBOX also . Eg : Ctrl+F9 will exit DOSBOX rather running the code .
UPDATE :
You can save yourself some time by having DOSBox automatically MOUNT your folders
For DOSBox versions older then 0.73 browse into program installation folder and open the dosbox.conf file in any text editor. For version 0.73 go to Start Menu and click on "Configuration" and then "Edit Configuration". Then scroll down to the very end, and add the lines which you want to automatically execute when DOS BOX starts.
Now those commands will be executed automatically when DOS BOX starts!
If still you face some problem running the program read the comments below or post you query as a comment .
How do I tell if I have 32 bit or 64 bit ?
According to the MS XP Newsgroups, this question is being asked almost as much as questions about the Blaster virus lately.
Here are a few ways that you can tell whether you have the 32 Bit or 64 Bit version.
----------------------
Right click My Computer, click Properties.
If you have a 64 bit computer, *it will say 64 bit on that page*.
Also 64 bit is available for Windows XP Pro *not Windows XP Home*.
----------------------
Go to Kelly's Korner XP site at the link below and scroll all the way down to:
Do you have a 32 or 64 bit in XP?
You'll see 2 downloads, 1 for an .exe file and 1 for a .vbs file that will tell you. Here's the link.
http://www.kellys-korner-xp.com/xp_tweaks.htm
NOTE: I can not personally vouch as to just what the .exe file will do, but I would trust it from her site.
I did open the .vbs file and it is quite safe to run.
This manual method will accomplish the same as the .vbs file above
----------------------
Manual:method
Go to Start/Run/CMD and type in: systeminfo.
System Type will probably read: X86
Or go to Start/Run/Regedit and navigate to this key:
HKEY_LOCAL_MACHINE\SYSTEM\CurrentControlSet\Control\Session Manager\Environment.
In the right pane: Processor_Architecture should read: x86 for 32 bit.
You *cannot* buy XP 64-bit edition "off the shelf" in *any* software store, or off of *any* retail outlet.
If you're running 64-bit WinXP, at the *minimum* you're using it in a professional engineering or scientific environment, and most likely have an IT department taking care of these things for you.
I hope this helps to clear this up.
How to copy images in Orkut Albums
There are two tricks which can be used to copy images from the Orkut Albums out of which the first one can be fixed by Orkut developers and the second one which can never be fixed by Orkut developers.
Trick #1
1. Open the album image you want to copy.
2. Drag the image to the address bar and the image will be loaded in browser with the direct URL to the image in the address bar.
3. Now you can right click and save the picture.
Trick #2
1. Right Click near the image.
2. Select This Frame > View Frame Source.
3. Look for this line :
http://images.orkut.com/orkut/albums2/ATcAAADH7F1-3-8V8eHgTvxE4E8i9DUQ2PbHBWhiXBPFMWtlfS64bzmqiRxxeMUoo_BYkyS5AMRxJUBPDSluRGwtJoORAJtU9VBuBz-JVLSovRH9jI82kVu_pFjsKg.jpg
4. The URL in the above line is the direct URL of that image.
5. Open the image URL in a new window or tab.
6. Now you can right click and save the picture.
Note : The same principle works for Google Chrome and Opera too. Although IE 6 won’t do good. And I have not tried the trick on later versions of IE.
Bonus Trick
Apart from any trick you can also use the Print Screen method. Press Print Screen on your keyboard and paste the screenshot in any image editor or Ms Paint. Crop the portion you want and save it. Thats it.
If you have any questions then leave them in the comments and I will try to answer them.
Run Commands in Windows

Do you use the Run feature in Windows XP? For most, this feature remains unused (or rarely used). Why is that? Well, first off nearly all of the Run Commands Correspond to a particular Control Panel Item or a Utility, Tool or Task that can be accessed through Windows.
Here is the list of diffrent Run command. To access go to run (Win + R )
* Accessibility Controls : access.cpl
* Accessibility Wizard : accwiz
* Add Hardware Wizard : hdwwiz.cpl
* Add/Remove Programs : appwiz.cpl
* Administrative Tools control : admintools
* Adobe Acrobat (if installed) : acrobat
* Adobe Designer (if installed) : acrodist
* Adobe Distiller (if installed) : acrodist
* Adobe ImageReady (if installed) : imageready
* Adobe Photoshop (if installed) : photoshop
* Automatic Updates : wuaucpl.cpl
* Bluetooth Transfer Wizard : fsquirt
* Calculator : calc
* Certificate Manager : certmgr.msc
* Character Map : charmap
* Check Disk Utility : chkdsk
* Clipboard Viewer : clipbrd
* Command Prompt : cmd
* Component Services : dcomcnfg
* Computer Management : compmgmt.msc
* Control Panel : control
* Date and Time Properties : timedate.cpl
* DDE Shares : ddeshare
* Device Manager : devmgmt.msc
* Direct X Control Panel (If Installed)* : directx.cpl
* Direct X Troubleshooter : dxdiag
* Disk Cleanup Utility : cleanmgr
* Disk Defragment : dfrg.msc
* Disk Management : diskmgmt.msc
* Disk Partition Manager : diskpart
* Display Properties control : desktop
* Display Properties : desk.cpl
* Display Properties (w/Appearance Tab Preselected) control : color
* Dr. Watson System Troubleshooting Utility : drwtsn32
* Driver Verifier Utility : verifier
* Event Viewer : eventvwr.msc
* Files and Settings Transfer Tool : migwiz
* File Signature Verification Tool : sigverif
* Findfast : findfast.cpl
* Firefox (if installed) : firefox
* Folders Properties control : folders
* Fonts control : fonts
* Fonts Folder : fonts
* Free Cell Card Game : freecell
* Game Controllers : joy.cpl
* Group Policy Editor (XP Prof) : gpedit.msc
* Hearts Card Game : mshearts
* Help and Support : helpctr
* HyperTerminal : hypertrm
* Iexpress Wizard : iexpress
* Indexing Service : ciadv.msc
* Internet Connection Wizard : icwconn1
* Internet Explorer : iexplore
* Internet Properties : inetcpl.cpl
* Internet Setup Wizard : inetwiz
* IP Configuration (Display Connection Configuration) : ipconfig /all
* IP Configuration (Display DNS Cache Contents) : ipconfig /displaydns
* IP Configuration (Delete DNS Cache Contents) : ipconfig /flushdns
* IP Configuration (Release All Connections) : ipconfig /release
* IP Configuration (Renew All Connections) : ipconfig /renew
* IP Configuration (Refreshes DHCP & Re-Registers DNS) : ipconfig /registerdns
* IP Configuration (Display DHCP Class ID) : ipconfig /showclassid
* IP Configuration (Modifies DHCP Class ID) : ipconfig /setclassid
* Java Control Panel (If Installed) : jpicpl32.cpl
* Java Control Panel (If Installed) : javaws
* Keyboard Properties control : keyboard
* Local Security Settings : secpol.msc
* Local Users and Groups : lusrmgr.msc
* Logs You Out Of Windows : logoff
* Malicious Software Removal Tool : mrt
* Microsoft Access (if installed) : access.cpl
* Microsoft Chat : winchat
* Microsoft Excel (if installed) : excel
* Microsoft Frontpage (if installed) : frontpg
* Microsoft Movie Maker : moviemk
* Microsoft Paint : mspaint
* Microsoft Powerpoint (if installed) : powerpnt
* Microsoft Word (if installed) : winword
* Microsoft Syncronization Tool : mobsync
* Minesweeper Game : winmine
* Mouse Properties control : mouse
* Mouse Properties : main.cpl
* Nero (if installed) : nero
* Netmeeting : conf
* Network Connections control : netconnections
* Network Connections : ncpa.cpl
* Network Setup Wizard : netsetup.cpl
* Notepad : notepad
* Nview Desktop Manager (If Installed) : nvtuicpl.cpl
* Object Packager : packager
* ODBC Data Source Administrator : odbccp32.cpl
* On Screen Keyboard : osk
* Opens AC3 Filter (If Installed) : ac3filter.cpl
* Outlook Express : msimn
* Paint : pbrush
* Password Properties : password.cpl
* Performance Monitor : perfmon.msc
* Performance Monitor : perfmon
* Phone and Modem Options : telephon.cpl
* Phone Dialer : dialer
* Pinball Game : pinball
* Power Configuration : powercfg.cpl
* Printers and Faxes control : printers
* Printers Folder : printers
* Private Character Editor : eudcedit
* Quicktime (If Installed) : QuickTime.cpl
* Quicktime Player (if installed) : quicktimeplayer
* Real Player (if installed) : realplay
* Regional Settings : intl.cpl
* Registry Editor : regedit
* Registry Editor : regedit32
* Remote Access Phonebook : rasphone
* Remote Desktop : mstsc
* Removable Storage : ntmsmgr.msc
* Removable Storage Operator Requests : ntmsoprq.msc
* Resultant Set of Policy (XP Prof) : rsop.msc
* Scanners and Cameras : sticpl.cpl
* Scheduled Tasks control : schedtasks
* Security Center : wscui.cpl
* Services : services.msc
* Shared Folders : fsmgmt.msc
* Shuts Down Windows : shutdown
* Sounds and Audio : mmsys.cpl
* Spider Solitare Card Game : spider
* SQL Client Configuration : cliconfg
* System Configuration Editor : sysedit
* System Configuration Utility : msconfig
* System File Checker Utility (Scan Immediately) : sfc /scannow
* System File Checker Utility (Scan Once At Next Boot) : sfc /scanonce
* System File Checker Utility (Scan On Every Boot) : sfc /scanboot
* System File Checker Utility (Return to Default Setting) : sfc /revert
* System File Checker Utility (Purge File Cache) : sfc /purgecache
* System File Checker Utility (Set Cache Size to size x) : sfc /cachesize=x
* System Information : msinfo32
* System Properties : sysdm.cpl
* Task Manager : taskmgr
* TCP Tester : tcptest
* Telnet Client : telnet
* Tweak UI (if installed) : tweakui
* User Account Management : nusrmgr.cpl
* Utility Manager : utilman
* Windows Address Book : wab
* Windows Address Book Import Utility : wabmig
* Windows Backup Utility (if installed) : ntbackup
* Windows Explorer : explorer
* Windows Firewall : firewall.cpl
* Windows Magnifier : magnify
* Windows Management Infrastructure : wmimgmt.msc
* Windows Media Player : wmplayer
* Windows Messenger : msmsgs
* Windows Picture Import Wizard (need camera connected) : wiaacmgr
* Windows System Security Tool : syskey
* Windows Update Launches : wupdmgr
* Windows Version (to show which version of windows) : winver
* Windows XP Tour Wizard : tourstart
* Wordpad : write
If you found this list of Run Commands useful, Please Bookmark my site for future use.
How to Uninstall and Remove Windows 7 or Vista Leaving Windows XP on Dual Boot System
Windows operating system supports dual-booting a PC, where users can install multiple OSes and select which system to boot up to on machine startup. If you have installed Windows 7 or Windows Vista on top of current existing Windows XP to make the PC a dual boot system, but now decided to ditch or dump the Windows 7 or Windows Vista
partition to revert to the old good classic Windows XP follow the guide below to uninstall and remove Windows 7 or Windows Vista to leave only Windows XP without having to reinstall the OS, and without affecting saved files and data.
Important: Do not use this tutorial if your dualboot system is Windows 7 and Windows Vista.
1. Boot up and log on to Windows XP desktop.
2. Insert the Windows Vista or Windows 7 DVD installation disc into CD-ROM or DVD-ROM optical drive.
Alternatively, mount the Windows 7 or Windows Vista DVD ISO image on any virtual drive.
3. Run Command Prompt, or click directly to Start menu -> Run command.
4. In the command prompt or the Run text box, issue the following command and hit Enter:
[DVD Drive Letter]:\boot\bootsect.exe /nt52 ALL /force
For example,
If the DVD drive path is D:, then enter the following:
D:\boot\bootsect.exe /nt52 ALL /force
The step will remove the boot menu to select operating system to start.
5. Remove the DVD disc and restart the computer.
6. The computer will boot up with Windows XP installation partition.
7. Manually remove files and folders of Windows Vista or Windows 7, including Windows, Program Files and Users folder. If you’re installing to separate partition, just format the partition to clean it instantly (with FDisk, Disk Manager of Computer Management or third party partition management software such as Partition Magic or EASEUS Partition Manager).
8. On the root system folder of Windows XP, delete Boot.BAK and BootSect.BAK. The two files are remnant backup leftover files of previously installed Windows Vista or Windows 7 bootloader, but no longer useful for Windows XP only system.
Tip: NT52 is the MBR (Master Boot Record) used by Windows XP and Windows Server 2003, while Windows Vista uses NT6. So if you’re uninstall Windows 7 in Vista/7 dual boot system, change the NT52 in the command to NT60.
Fast Shortcut: It’s also possible to format the Windows Vista or Windows 7 partition straight away, and then start the computer with Windows XP Setup CD to repair the system partition, or run the “bootsect /nt52 c:” command above from the \boot\ folder of leftover OS immediately to repair the boot partition.
Tip: When startup repair the boot record after removing an installed operating system from dual-boot or multi-boot system, always use the highest version of Windows installation DVD/CD to perform the repair. For example, in a tri-boot PC with Windows XP, Vista and 7, after uninstalling Windows 7, use Windows Vista to repair the system. If the PC is restored and reverted back to Windows XP, then use the Windows XP setup CD.
Backup Software For Settings Of Mozilla Firefox !!
A great program called MozBackup packages up all your essential Firefox and Thunderbird settings: bookmarks, mail, contacts, history, extensions, cache etc. The newest release of this essential utility for all Firefox users now supports popular extensions Scrapbook and Tabbrowser Preferences.
Download MozBackup for Windows. Install the app and run it. Pick which Mozilla program and which user and choose "Backup a profile." You will be able to password-protect your backup file if you'd like. (Click to enlarge the screenshot.)

Firefox or Thunderbird can't be running while the backup is created. When you're done, the resulting .pcv file (which is really just a zip file) will contain all your settings. Email it to yourself and save it on your new work computer. Download and install MozBackup there and run it, this time choosing to "Restore a profile" rather than back up. That should set up your Firefox exactly how you had it at your old office.
Coincidentally, it's a great idea to run MozBackup before you install new Firefox extensions that are in development or that you fear might bork up your profile directory. Your backed up profile lets you rollback easily.
Good luck at the new job!
How do I tell if I have 32 bit or 64 bit ??
Here are a few ways that you can tell whether you have the 32 Bit or 64 Bit version.
----------------------
Right click My Computer, click Properties.
If you have a 64 bit computer, *it will say 64 bit on that page*.
Also 64 bit is available for Windows XP Pro *not Windows XP Home*.
----------------------
Go to Kelly's Korner XP site at the link below and scroll all the way down to:
Do you have a 32 or 64 bit in XP?
You'll see 2 downloads, 1 for an .exe file and 1 for a .vbs file that will tell you. Here's the link.
http://www.kellys-korner-xp.com/xp_tweaks.htm
NOTE: I can not personally vouch as to just what the .exe file will do, but I would trust it from her site.
I did open the .vbs file and it is quite safe to run.
This manual method will accomplish the same as the .vbs file above
----------------------
Manual:method
Go to Start/Run/CMD and type in: systeminfo.
System Type will probably read: X86
Or go to Start/Run/Regedit and navigate to this key:
HKEY_LOCAL_MACHINE\SYSTEM\CurrentControlSet\Control\Session Manager\Environment.
In the right pane: Processor_Architecture should read: x86 for 32 bit.
You *cannot* buy XP 64-bit edition "off the shelf" in *any* software store, or off of *any* retail outlet.
If you're running 64-bit WinXP, at the *minimum* you're using it in a professional engineering or scientific environment, and most likely have an IT department taking care of these things for you.
I hope this helps to clear this up.
----------------------
Right click My Computer, click Properties.
If you have a 64 bit computer, *it will say 64 bit on that page*.
Also 64 bit is available for Windows XP Pro *not Windows XP Home*.
----------------------
Go to Kelly's Korner XP site at the link below and scroll all the way down to:
Do you have a 32 or 64 bit in XP?
You'll see 2 downloads, 1 for an .exe file and 1 for a .vbs file that will tell you. Here's the link.
http://www.kellys-korner-xp.com/xp_tweaks.htm
NOTE: I can not personally vouch as to just what the .exe file will do, but I would trust it from her site.
I did open the .vbs file and it is quite safe to run.
This manual method will accomplish the same as the .vbs file above
----------------------
Manual:method
Go to Start/Run/CMD and type in: systeminfo.
System Type will probably read: X86
Or go to Start/Run/Regedit and navigate to this key:
HKEY_LOCAL_MACHINE\SYSTEM\CurrentControlSet\Control\Session Manager\Environment.
In the right pane: Processor_Architecture should read: x86 for 32 bit.
You *cannot* buy XP 64-bit edition "off the shelf" in *any* software store, or off of *any* retail outlet.
If you're running 64-bit WinXP, at the *minimum* you're using it in a professional engineering or scientific environment, and most likely have an IT department taking care of these things for you.
I hope this helps to clear this up.
How do I change my Windows mouse cursor?
Question:
How do I change my Windows mouse cursor?
Answer:
Below are the steps on how to change the Microsoft Windows mouse cursor. It is important to realize that some programs may use their own mouse cursors and that following the below steps will only change the Windows cursors and not the cursors used in third-party programs or games.
1. Open the Control Panel.
2. In the Control Panel double-click the Mouse icon.
3. In the Mouse Properties click the Pointers tab.
4. In Pointers click the down arrow on the Scheme and select another cursor scheme you wish to use.
In addition to changing the scheme you can individually change each type of cursor by double-clicking each of the cursors and selecting the new cursor you wish to use. If you individually change each cursor or modify a scheme with new cursors we suggest saving the scheme as a new scheme.
How to remove virus from USB drive?
I was faced with the problem of how to remove virus from usb drive recently. Normally I would have taken the nuclear option i.e format the USB drive to remove the virus. :) Unfortunately I had the entire source code for my blog ranking project on the pen-drive before it got infected by the virus. That meant I had to show restraint and deal with the issue in a diplomatic manner. :(
Anti-virus software failed to delete virus from USB Drive

One run of the anti-virus software and the virus will be history is what I thought. However removing the virus from the USB drive proved to be a lot more difficult task than I had initially guessed. I was left scratching my head for sometime. Why the hell did the USB drive continue to be infected by the virus?Frustrated I consulted my best friend ….Google. Well I had overlooked a simple concept. The virus had made itself read-only. No wonder the poor anti-virus software was identifying it but failed to remove the virus.
To remove the virus from usb drive you need to
Remove Virus from USB Drive
1. Go to Start—-Run. Type cmd and hit enter. This will bring up the command prompt.
2. Type the drive name of the USB drive and hit enter.
3. In command prompt type attrib -r -a -s -h *.* and press enter. This will remove the Read Only, Archive, System and hidden file attribute from all the files.
4. Now just delete the files using the command del filename
That’s it. The virus has been removed from the USB drive.
Turn off or remove “Your computer might be at risk” in Windows XP
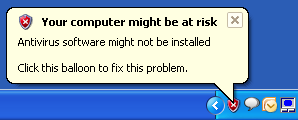
I recently reformatted my computer because it was running slow and after installing all updates and programs, I started getting that annoying message that started in Windows XP SP2, which is:
Your computer might be at risk. Antivirus software might not be installed.
It’s fine if you don’t know how to use a computer or forget to install something, but if you know what you are doing, then this nagging popup message is useless. So how can you turn off that message? Here’s how!

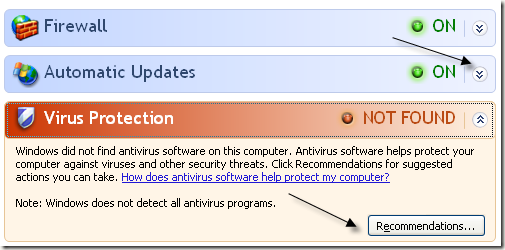
Step 1: Open the Control Panel
and click on Security Center.

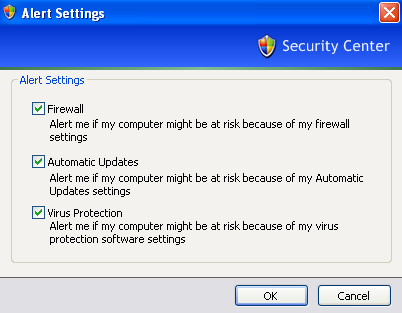
Step 2: Now on the item(s) that are in red, either Firewall, Automatic Updates, or Virus Protection, click on the double arrow that is pointing down and click on Recommendations.

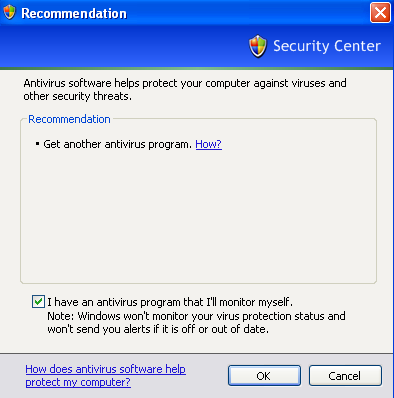
Step 3: At the bottom, click on the checkbox that says “I have an antivirus program that’ I’ll monitor myself” and then click OK.

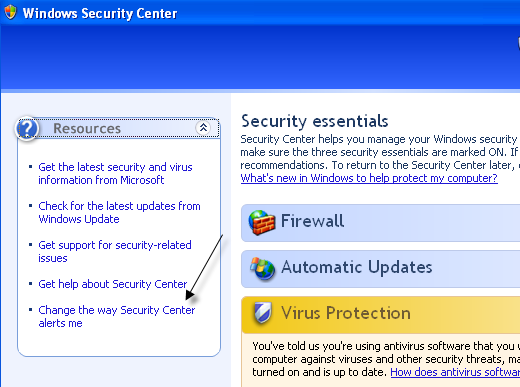
Note that you can do this for the “Firewall is not turned on” and “Automatic updates is not turned on” popup messages also. You can also simply click on the Change the way Security Center alerts me link at the left in Windows Security Center.

Now just un-check what you do not want monitored anymore and you won’t get the “Your computer might be at risk” message again!

That’s it! Pretty simple eh? Of course, you should make sure you do have some kind of anti virus program installed and a firewall also. Keeping Automatic Updates on is pretty smart too! Enjoy!
Your computer might be at risk. Antivirus software might not be installed.
It’s fine if you don’t know how to use a computer or forget to install something, but if you know what you are doing, then this nagging popup message is useless. So how can you turn off that message? Here’s how!
Step 1: Open the Control Panel
and click on Security Center.

Step 2: Now on the item(s) that are in red, either Firewall, Automatic Updates, or Virus Protection, click on the double arrow that is pointing down and click on Recommendations.
Step 3: At the bottom, click on the checkbox that says “I have an antivirus program that’ I’ll monitor myself” and then click OK.
Note that you can do this for the “Firewall is not turned on” and “Automatic updates is not turned on” popup messages also. You can also simply click on the Change the way Security Center alerts me link at the left in Windows Security Center.
Now just un-check what you do not want monitored anymore and you won’t get the “Your computer might be at risk” message again!
That’s it! Pretty simple eh? Of course, you should make sure you do have some kind of anti virus program installed and a firewall also. Keeping Automatic Updates on is pretty smart too! Enjoy!
Difference Between Intel core 2 duo vs Intel dual core vs Intel Pentium D


Intel core 2 duo, Intel dual core and Intel Pentium D are the 3 type of processors from the chip maker intel. However not many people are sure about the exact difference between the 3.
The confusion of Intel core 2 duo, Intel dual core and Intel Pentium D
The confusion between Intel core 2 duo and Intel dual core primarily resulted from a stupid naming convention by Intel. 2 and dual may be synonyms in English but that does not make Intel core 2 duo vs Intel dual core any more similar. The similarity of names makes even many computer geeks confused when asked to do a comparison of Intel core 2 duo and Intel dual core.
Intel Pentium D CPU comprises of two dies, each containing a single core residing next to each other on a multi-chip module package. The Pentium D consumes a relatively high power. It runs very hot and is not a good OverClocker.
Intel Dual Core
Intel Dual Core is the first dual-core CPU from Intel. The Dual core makes use of two cores on a single die i.e it has two chips in one package. It solves the problem of overheating of Intel Pentium D without compromising on the performance.
Intel Core 2 Duo
Intel Core 2 Duo processors are the next gen processors from Intel. It is developed with a new Architecture called Core. The new architecture of Intel core2 duo makes it a lot better processor that runs cool. Most importantly the Intel core2 duo is a super over clocker.
I hope the comparison between Intel core2 duo and Intel dual core has made the decission of choosing a better processor for your laptop comparatively easier. Let me know if you still have any concerns in the comments and I shall answer them after more research.
Intel Dual Core is the first dual-core CPU from Intel. The
Subscribe to:
Posts (Atom)